

The Grown-Up's Guide to Making Art with Kids: 25+ fun and easy projects to inspire you and the little ones in your life
112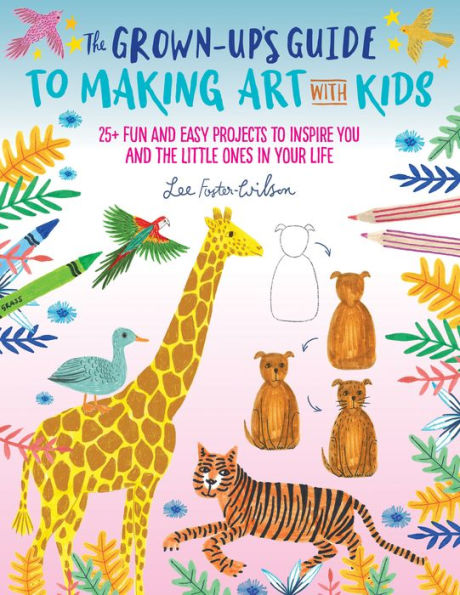
The Grown-Up's Guide to Making Art with Kids: 25+ fun and easy projects to inspire you and the little ones in your life
112eBook
Related collections and offers
Overview
The Grown-Up's Guide to Making Art with Kids includes drawing and painting projects featuring popular, kid-friendly, and on-trend subjects—like dinosaurs, pets, flowers, and robots—that adults and kids can create together. Guided practice pages invite interactivity and allow children and adults to draw and paint the same subjects, side by side, for a fun-filled joint activity. The book’s artwork is colorful, cheerful, approachable, and done using ordinary, easily available art tools, including markers, crayons, colored pencils, and acrylic paint.
In addition to drawing lessons, The Grown-Up’s Guide to Making Art with Kids also includes projects and ideas for using artwork created from the prompts in the book to make crafts, including a map, pop-up art, paper dolls, and much more.
The Grown-Up’s Guide to Making Art with Kids teaches valuable drawing, painting, and crafting skills to both kids and adults; inspires creativity; and encourages family togetherness. What better way to avoid screen time than by drawing, painting, and creating together with your kids? Follow-up books in the series that are also ideal for kids and adults to do together include The Grown-Up's Guide to Painting with Kids and The Grown-Up's Guide to Crafting with Kids, both publishing in June 2020.

Product Details
| ISBN-13: | 9781633227408 |
|---|---|
| Publisher: | Foster, Walter Publishing, Incorporated |
| Publication date: | 05/21/2019 |
| Series: | Grown-Up's Guide |
| Sold by: | Barnes & Noble |
| Format: | eBook |
| Pages: | 112 |
| File size: | 34 MB |
| Note: | This product may take a few minutes to download. |
| Age Range: | 4 - 10 Years |
About the Author
Lee Foster-Wilson is an artist and a designer in Cornwall, England. She worked as a graphic designer before becoming a full-time artist with her own business called Bonbi Forest. Lee's artworks and prints have been featured on Design Sponge and in Vogue, Good Housekeeping, Marie Claire, NYLON, and The Guardian. She is the author of Creative Marker Art and Beyond and The Grown-Up's Guide to Making Art with Kids, both from Walter Foster Publishing. Learn more about Lee at www.bonbiforest.com.
Lee Foster-Wilson is an artist and a designer in Cornwall, England. She worked as a graphic designer before becoming a full-time artist with her own business called Bonbi Forest. Lee's artworks and prints have been featured on Design Sponge and in Vogue, Good Housekeeping, Marie Claire, NYLON, and The Guardian. She is the author of Creative Marker Art and Beyond and The Grown-Up's Guide to Making Art with Kids, both from Walter Foster Publishing. Learn more about Lee at www.bonbiforest.com.
Read an Excerpt
CHAPTER 1
DRAWING TUTORIAL
ANIMALS
Let's start with something that all kids will ask grown-ups to draw at some point: animals! Knowing how to draw animals is a good skill to have if your youngster asks for help creating a picture of the family pet or the bird that frequents the feeder in your garden. And we can't forget wild animals too!
We'll begin with furry pets because their shapes are a bit easier to draw!
CATS & DOGS
When drawing animals, I like to break them down into the simple shapes you see here. A cat or dog's body is an oval that's flat at the bottom; the head is a squat circle; and the ears are two little triangles.
Color in your shapes. With a darker color or a pencil, add the animal's facial features. Also draw in legs with rounded paws and little claws or toes.
Add fur, keeping in mind the direction of hair growth. Make the lines around the face sparser, as an animal's hair is shorter there.
TO DRAW FUR AND WHISKERS, PRESS HARDER ON YOUR DRAWING TOOL AT THE BEGINNING OF THE STROKE AND LIFT THE TIP AT THE END.
Follow the same basic principles when drawing animals from the side. Notice the large oval for the body and the smaller ovals for the shoulders, haunches, and head. The legs extend from the shoulders and haunches, thinning out at the bottom and bending slightly backwards.
To draw an animal that's walking, bend its legs and vary their angles.
Take a look at two more furry animals. The rabbit consists of a big circle and powerful haunches; the mouse has a long body and tiny legs.
LARGE ANIMALS
With their sleek hair and muscular bodies, larger animals, such as horses and cows, can be more difficult to draw. You just have to be more accurate when placing your shapes. This may take some practice!
Use egg shapes and ovals to draw the larger parts of a horse. The neck curves downward, and the legs consist of curved and straight lines.
A cow has a similar structure, with slightly different shapes. Don't forget the udders!
WHEN DRAWING A MANE OR A TAIL, START WITH LONG, WAVY LINES AT THE TOP TO SHOW MOVEMENT IN THE HAIR.
Adding details is a lot of fun! You can add spots and markings or color in the animal by moving your drawing tool in the direction of hair growth. Draw round eyes and oval nostrils.
WILDLIFE
Once you have mastered an animal's basic shape, try creating more exotic versions of your cats, dogs, and horses!
Draw a cat! Then add stripes to make it a tiger, spots for a cheetah, or a fuzzy mane if it's a lion! Big cats have longer, sleeker bodies and thicker legs than domestic cats, so you can play around with the body structure here.
Turn your horse into a zebra by shortening its neck and body, making its mane and tail stubbier, and adding stripes.
Now try drawing a giraffe. You can use the same basic structure for any large, four-legged animal. Then slope the back, lengthen the neck, and create the giraffe's distinctive pattern.
Interested in drawing a more complex-looking animal? Lay a sheet of tracing paper over a photo and find the main shapes within the animal's body. You will notice that most mammals share the same basic structure.
BIRDS
Birds are one of my favorite drawing subjects. Like the animals you already learned to draw, birds consist of a simple structure: an oval body; a small, round head; lines for the tail feathers and beak; and a neck if it's a waterbird or fowl.
Depending on the type of bird and its position, the legs and claws will look different. A little bird on a branch will show just a few claws, while a flamingo will display long, spindly legs and big, webbed feet!
Use the structures here to draw birds, filling in the shapes and having fun with the feather patterns. Draw them semirealistically with curved lines, or go to town with crazy colors!
To draw a bird in flight, follow the same basic process. Instead of drawing folded wings, however, make a soft "S"-shaped line on each shoulder.
CHAPTER 2STEP-BY-STEP PROJECT
CRAZY CREATURES
This fun drawing and painting activity requires few materials and is a great way to fire up your child's imagination. It's a little like the age-old game of looking at clouds and guessing what they look like, but this time, you'll play with paint and pens!
Tools & Materials
• Assorted paint colors
• Paintbrushes — and your fingertips!
• Sheets of paper or card stock
• Fineliner pens
STEP 1
Choose one paint color, and have your child use a paintbrush or fingertips to make small blobs and shapes on a sheet of paper or card stock. Kids will love creating shapes of their own!
STEP 2
Continue making blobs across the page using different paint colors. Leave room around the blobs so that you can decorate them later.
MAKE DIFFERENT SHAPES: SOME CAN BE ROUND, AND OTHERS CAN BE SHAPED LIKE OVALS OR EVEN SNAKES!
STEP 3
Let the blobs dry. Meanwhile, look at your shapes and think about the creatures they can become. Did the bristles of your paintbrush leave marks that look like hair? Do the shapes already resemble animals or monsters? Ask for your kids' help here; children have vivid imaginations and will love this step!
STEP 4
Now put that imagination to work and use fineliner pens to add eyes, legs, feet, tails, hair, and more to create funny little creatures.
STEP 5
Finish transforming all of the blobs and shapes into crazy creatures. Now you and your child have a fun piece of art that you can display in your home, or you can cut out some of the creatures and glue them onto a card as a gift to a friend!
CHAPTER 3DRAWING TUTORIAL
On the Move
When learning to draw cars and moving machines, one of my top tips is to practice by drawing toys. Toys often lack substantive details, allowing you to focus on the item that you're drawing rather than getting caught up in trying to draw it too realistically. This will give you an effective image to which you can add details later if you wish.
CARS & BUSES
Begin by drawing a side view of a vehicle. Start with the wheels. Pay attention to their size relative to the rest of the car. In this car, the wheels are approximately 2½ wheel widths apart. I like to mark where I'll place my wheels before adding them. You can gauge where the body of the car curves relative to the wheels using imaginary vertical lines, which I've marked here.
Then, using the car's body color, outline the rest of the car, moving from left to right. Now color it in and add windows, doors, and lights using a darker color.
Next, draw a car from the three-quarters perspective. The process is generally the same, but keep in mind that the wheels will look like ovals and should be at a slight angle. Angle the body of the car too.
I LIKE TO ADD COLOR RIGHT AWAY, SO IF I MAKE A MISTAKE, I CAN COVER IT UP BY ADDING MORE COLOR OR INCREASING THE SIZE OF MY DRAWING.
Follow the same drawing principles to create just about any other type of vehicle.
BOATS
When drawing or painting boats, keep in mind that they float in the water, not on top of it, so you won't see the bottom half of the vessel in your artwork.
I like to start by drawing the water, and then I work my way up through the hull. Lastly, depending on the type of boat, I draw the cabin or sails on top.
To draw a sailboat, lightly sketch in the mast; then draw the sails before finalizing the mast. This will help you place the sails without having to erase areas of the mast.
DON'T FORGET TO ADD DETAILS LIKE PORTHOLES, FLOTATION DEVICES, AND OARS TO MAKE YOUR DRAWING COME TO LIFE.
BICYCLES
I draw bikes starting with the frame. Using a light color for the frame makes it easier to add darker details on top. Unless you have incredible freehand-drawing skills, creating bike wheels will never be easy — just make sure to take your time and don't draw over the frame. Embrace the hand-drawn quality of your wheels, and space out the spokes evenly.
HEAVY-DUTY VEHICLES & TRAINS
As with other vehicles, I like to draw heavy machinery starting with the wheels and working my way up. Don't forget to leave room for details, such as a blade if you're drawing a bulldozer or a shovel if it's a digger.
I've only included very basic instructions for drawing vehicles. The most important thing to remember is getting the wheel sizing and spacing right. The rest will follow more easily.
Trains can be drawn the same way, or you can draw the individual cars first, and then add little wheels and train tracks afterward.
CHAPTER 4STEP-BY-STEP PROJECT
Pop-Up Scene
Kids will love seeing their drawings come to life in this three-dimensional art project. Add or subtract elements to make it as simple or complex as you wish.
Tools & Materials
• Light-colored sheet of thick paper (plus a spare sheet in case you make a mistake!)
• cereal box, cut open to form a flat surface
• Pencil
• Scissors
• Glue stick
• Markers or paints and paintbrushes
STEP 1
Fold the thick paper in half lengthwise, and then unfold it.
STEP 2
Place the sheet of paper on top of the cereal box so that the folds line up. With a pencil, trace around the sheet of paper onto the cereal box.
Place the sheet of paper above or below the outline you just created and retrace it to form a larger rectangle. The edges don't have to be uniform; you can make them wavy or zig-zag.
Cut out the shape you just created and save the leftover cardboard.
STEP 3
Fold the sheet of paper, and make two 3-inch cuts to the folded side. Then make two more pairs of cuts: two 2-inch cuts and two 1-inch cuts.
Unfold the sheet, and you should have three strips of different lengths across the center of the sheet.
STEP 4
Fold the strips so that they stick out from the sheet of paper in a square shape.
STEP 5
Place the cut paper on top of the cereal box, and align their folds. Glue the paper onto the cereal box, without applying glue to the folds.
STEP 6
Using your leftover cardboard, sketch the outlines of three vehicles. You will need to attach each car to one of the folded strips, so make sure the vehicles are large enough to cover the strips.
STEP 7
Cut out the vehicles and apply a base coat of paint to each one. Let them dry.
STEP 8
Now, paint the background of your pop-up scene. My kids and I painted buildings, a road, and some bushes in the foreground.
STEP 9
The vehicles should be dry by now. Add details to them, such as windows, wheels, and lights.
STEP 10
Arrange the cars on the strips and glue them down to finish your pop-up scene!
NOW THAT YOU AND YOUR KIDS HAVE MADE A POPUP SCENE TOGETHER, WHY NOT CREATE A POP-UP CARD? YOU CAN ALSO TRY EXPERIMENTING WITH DIFFERENT SUBJECTS, LIKE A FOREST WITH TREES AND ANIMALS, A CITYSCAPE, OR A HOME FILLED WITH PARTYGOERS. MY CHILDREN AND I MADE A VOLCANO AND DINOSAURS!
CHAPTER 5DRAWING TUTORIAL
People
Now, let's move on to drawing people! Over the years, I've lost count of how many times my kids have asked me to draw our family or scenes of people doing different activities. Young children love it when they can spot a resemblance in art, so it's even better if you can add a likeness and an expression to the faces you draw.
IT'S ALL IN THE FACE
When depicting people, one of my favorite ways to warm up is by drawing many different faces. This way, I don't have to worry about getting the body anatomically correct, but I can still come up with a variety of characters and have fun with their facial expressions, hairdos, and accessories!
On a piece of paper, use a pencil to draw an oval for the head, with a little neck sticking out of the bottom.
Lightly draw a horizontal line across the center of the oval. In an anatomically correct image, this is where the eyes will go; add them now. Also draw in the eyebrows, nose, and a smiling mouth.
Add more features, like ears and hair, and you've drawn a simple face!
Now let's draw a woman's face! Draw the head and the neck; then pencil in a line across the center of the face. Add outlines for the eyes, but this time, draw the pupils in one corner of each eye so that the subject appears to be looking to one side.
Add eyebrows and a nose.
Finally, add ears, a surprised-looking mouth, and hair!
FACIAL FEATURES
Play around with drawing different facial features, such as eyes, eyebrows, noses, and mouths.
Notice how varying the features even slightly can change the facial expression.
ADDING COLOR
It's time to add color. I drew these faces by outlining the heads and eyes in marker and then coloring in the rest. I added the other facial features using a pencil.
PROFILES
Drawing a head from the side is kind of like drawing half a face. Try drawing an inverted egg, with the narrowest point being the chin. Then add the facial features.
HAIRSTYLES
Now let's add hair! Varying the hairstyle really changes a person's appearance. Feel free to go crazy with color too! Here are some examples of hairstyles, as well as tips for drawing them.
To draw long hair, start at the top of the head, and form a line where you want the hair to lie around the face. Draw another line at the back of the head, and then fill in the rest of the hair with separate strokes. Taper the strokes at the bottom.
Use short, back-and-forth strokes to draw a cropped hairstyle. Make sure the hair moves away from the hairline, not across it.
Drawing spiky hair is similar to drawing cropped hair, but taper the strokes into large spikes at the top, angling the strokes slightly.
To create curls, make tiny, scribbled circles, changing direction often. Then use a lighter color to shade over anywhere that the paper shows through.
Ponytails are difficult to draw from the front, so I like to make them swing to one side. Stroke from the front of the head to the back, and taper the ends to give the hair movement.
To create a bob with bangs, draw the hair moving away from the part. The front should frame the face.
Draw a bun the same way you drew a ponytail. Obscure the bottom of the circle behind the back of the head when drawing a bun from the front.
To draw longer curly hair, make random scribbles until you've filled in the whole head. Lightly shade over the hair with the same motion to eliminate any background color. Use a darker shade to add loose, defining curls on top.
Stubble and beards have the same basic shape, but you'll use dots for stubble and short, quick, back-and-forth strokes for a beard.
PRACTICE HERE!
Rotate this book; then use the areas below to practice what you've learned. Invite your child to practice on one side while you practice on the other.
ACCESSORIES
Accessories are really fun to draw! Here are a few tips:
• It's easier to add a hat first, before drawing the hair underneath it.
• To draw glasses, start with the frames, and then add a little arch for the bridge and lines at the sides.
• Color in eyeglasses to turn them into sunglasses.
BODIES
My kids love seeing full-body drawings too! Let's look at some simplified outlines of bodies that will help you get the proportions right.
As a general rule of thumb, young children are approximately 4 heads high, older children are 6 heads high, and adults are 8 heads high.
Similar to drawing an animal (see here), you can use ovals and circles to create a simplified version of a human's body. The fingertips should fall about 3½ head lengths from the ground.
After you've outlined the basic shapes of the body, fill in the limbs.
Once you get the hang of drawing a figure, you and your child can personalize your people! Maybe you want to use one of the faces you already drew and add features and hair. Clothes are fun to draw too!
The last step is to color everything in. Move your strokes downward on the limbs to show form.
CHAPTER 6STEP-BY-STEP PROJECT
Paper Doll Garland
If you like drawing people and creating outfits, this project will be right up your alley! This classic cutting and drawing activity is really fun to do with a little one's help.
Try making up stories and giving each doll a name and a personality as you draw and color.
Tools & Materials
• 3 sheets of paper
• Scissors
• Tape
• 2 paper clips
• Colored pencils and markers
STEP 1
Tape the short ends of your sheets of paper together to create one long sheet, without overlapping the edges.
STEP 2
Fold the paper concertina-style so that each sheet is divided into three and you end up with nine panels (you'll make eight folds). Try to fold the paper so that the tape runs on the outside of the fold.
STEP 3
Keep the paper folded and draw a doll on the top panel, making sure that the arms extend to the edges of the paper.
STEP 4
Use a paper clip to hold together the top and bottom edges of the folded paper.
STEP 5
It's time to cut out your doll! Don't forget to cut to the edges of the paper so that the dolls will stay attached to one another.
STEP 6
Carefully unfold your cut-out dolls and flatten them. If you folded the paper correctly, the taped edges and any pencil marks will appear on the backs of the dolls.
STEP 7
Start drawing! Play around with making up different outfits and facial expressions for the dolls. My kids and I like to add little buttons, necklaces, and shoelaces too!
(Continues…)
Excerpted from "The Grown-Up's Guide to Making Art with Kids"
by .
Copyright © 2019 Lee Foster-Wilson.
Excerpted by permission of The Quarto Group.
All rights reserved. No part of this excerpt may be reproduced or reprinted without permission in writing from the publisher.
Excerpts are provided by Dial-A-Book Inc. solely for the personal use of visitors to this web site.
Table of Contents
Introduction,
Tools & Materials,
Color Basics,
Drawing Tutorial: Animals,
Step-by-Step Project: Crazy Creatures,
Drawing Tutorial: On the Move,
Step-by-Step Project: Pop-Up Scene,
Drawing Tutorial: People,
Step-by-Step Project: Paper Doll Garland,
Drawing Tutorial: Leaves, Trees, and Flowers,
Step-by-Step Project: Leaf Rubbing Tree,
Drawing Tutorial: Buildings,
Step-by-Step Project: Map,
Drawing Tutorial: Reptiles, Sea Animals, Dinosaurs, and More,
Step-by-Step Project: Shadow Puppet Theater,
Drawing Tutorial: Robots,
Step-by-Step Project: Consequences Drawing Game,
Drawing Tutorial: Food & Beverages,
Step-by-Step Project: Still Life Collage,
Glossary,
About the Artist,