


Build-a-Bowl: 77 Satisfying & Nutritious Combos: Whole Grain + Vegetable + Protein + Sauce = Meal
192


Build-a-Bowl: 77 Satisfying & Nutritious Combos: Whole Grain + Vegetable + Protein + Sauce = Meal
192Paperback
-
PICK UP IN STORECheck Availability at Nearby Stores
Available within 2 business hours
Related collections and offers
Overview

Product Details
| ISBN-13: | 9781612129907 |
|---|---|
| Publisher: | Storey Publishing, LLC |
| Publication date: | 10/02/2018 |
| Pages: | 192 |
| Sales rank: | 168,644 |
| Product dimensions: | 7.90(w) x 8.90(h) x 0.50(d) |
About the Author
Read an Excerpt
CHAPTER 1
BUILD-A-BOWL BASICS
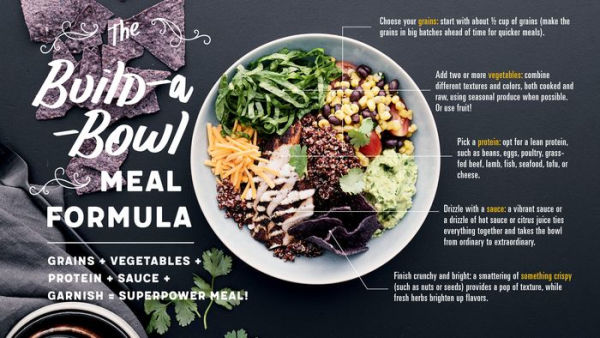
My goal is to help you whip up exciting, nourishing meals, from breakfast all the way to dinner. I've included fruity breakfast porridges, egg bowls, salads, hearty vegetarian dishes, lean meat mains, and more. These are some of my family's very favorite meals, and I hope they'll become some of yours, too. Following are a few of my tips for getting good food on your plate (or rather, in your bowl) even on a hectic Wednesday. And remember, every cook and kitchen is different, so I encourage you to follow your own instincts as you go!
NUTS AND SEEDS
A sprinkle of toasted nuts and seeds is an easy way to add an instant pop of texture and flavor to your bowls. Since many of the recipes in this book include seeds and nuts in some form, I suggest either buying them pre-toasted (if available) or toasting up big batches ahead of time. That way, they'll be ready and waiting for you. Store toasted nuts and seeds in sealed containers in the refrigerator or freezer to keep them fresh.
For cashews, almonds, walnuts, hazelnuts, and pecans: Spread the nuts in an even layer on a large baking sheet, and bake them in a 350°F (180°C) oven for 5 to 10 minutes, until fragrant and slightly darkened. Keep your eye on them during the last few minutes of cooking (and use a timer — I've burned more batches of nuts than I care to admit). For hazelnuts, rub the toasted nuts in a clean kitchen towel to remove the skins.
For pine nuts, pepitas, sunflower seeds, hemp seeds, and sesame seeds: Spread the nuts or seeds in a large skillet (I prefer to use the stovetop instead of the oven, as they go from golden to blackened quickly) and place it over medium heat. Cook, stirring often, until the nuts are golden and fragrant (the pepitas will also puff up), 4 to 6 minutes.
DIETARY RESTRICTIONS? (NO PROBLEM!)
If you don't eat gluten, don't worry. Every single recipe in this book is gluten-free as long as you use one of the gluten-free grains (the grains are all tagged). If you don't eat meat, there are a slew of plant-based dishes as well as numerous variations for vegetarians. And if you don't eat grains at all, most of the recipes are just as delicious without them!
MAKE-AHEAD OPTIONS
For me, this is key. If you're able to leisurely cook breakfast and dinner every night, then you can skip this section (And may I please come over? I'll do the dishes!). But if breakfast and dinner are usually rushed affairs, then read on.
While these recipes are simple, they're made of a few moving parts (that's what makes them interesting). So while you can absolutely start each recipe from scratch, if you can manage to knock out one or two tasks before the mealtime hour rolls around, then it's going to give you a big leg up. From cooking a few batches of grains days or even weeks in advance (see page 6) to making a couple of sauces on the weekend to roasting a batch of vegetables the night before to buzzing up a dressing before work, completing even the smallest of tasks ahead of time can have a big payoff later.
I find that the mental relief of having a few things ready might be even more important than the actual time saved. It's one less thing to think about while I simultaneously steam the green beans, unpack bags, help with homework, manage a meltdown, and post pictures to Instagram (priorities, people).
USE WHAT YOU HAVE
Do you have half of a bell pepper in the fridge that needs to get eaten? Slice it up and toss it in with the sauteed vegetables! Do you have a bunch of kale that's hiding in the back of your vegetable drawer? Swap it in for the spinach! Not a meat eater? Slide on an egg instead of the roasted shrimp! No grains in the pantry? Serve the meal on pasta instead!
You get it.
I encourage you to make these recipes your own, using items you have on hand or can easily find. I try to include variations where I can in the recipe notes, and I urge you to customize these recipes according to your own tastes and lifestyle.
SEASON AS YOU GO
I don't include salt and pepper quantities in my recipes unless a specific amount is necessary (such as for the grains, but you can cut back on the salt if you prefer) because seasoning is highly subjective. Not only that, the kosher salt I buy (Diamond Crystal, if you're interested) might be a totally different weight and salinity than the salt you use, meaning my teaspoon of salt could be way less salty than yours. So go ahead and season to your own tastes!
That being said, after teaching cooking classes for more than a decade, I've found that most people actually don't use enough salt, which can leave a dish or a sauce tasting flat. So unless you need to limit sodium for health reasons, be generous with your seasoning. Taste as you go, and season throughout the cooking process.
BOWLS ... OR PLATES
All of the recipes are designed as one-dish, complete meals, with layers of flavors that complement one another. Shallow bowls work great for this style of eating, but, with the exception of the breakfast porridges and soups, you can most certainly use plates, tire hubs, Frisbees, or whatever you usually eat off of. Also, you can either build your bowls in the kitchen before serving or you can serve each of the components separately on the table and let your friends or family build their own. If you're feeding kids, this gives them the freedom to choose what they want while also expanding their palates. I'll never forget the day Ella went back for seconds of the roasted broccoli after vowing for years that she hated it. It was better than Christmas.
ABOUT GRAINS
As a key source of complex carbohydrates and protein, grains have been at the root of human evolution since we discovered agriculture about 10,000 years ago. In this book, I feature both true grains and pseudo-cereal grains (a term that for some reason makes me think of Clark Kent). By definition, grains are cultivated cereals — the small, dry seeds that come from grasses, including wheat, barley, oats, millet, and rice. Pseudo-cereals (in their brown suits with thick black glasses), including quinoa and buckwheat, are not actually members of the grass family, so aren't technically grains. But since I'm a firm believer in nondiscrimination, I'm just going to refer to everything as grains.
Most of the varieties included in these pages, including quinoa, millet, sorghum, buckwheat, spelt, Khorasan wheat (Kamut), farro, einkorn, and barley, are considered ancient grains, meaning they are largely untouched by selective breeding and have hardly changed in the past several millennia. These ancient grains are often higher in fiber, protein, vitamins, and minerals than hybrids, and some people find that they're easier to digest. Quinoa, millet, sorghum, and buckwheat are also all gluten-free, as are the rice varieties.
WHAT ABOUT GRAIN-FREE DIETS?
Let's talk about the elephant in the room: what about the recent rise in popularity of grain-free diets such as the paleo diet? While whole grains have a long history of providing essential nutrients to humans and have an important place on my table, if a grain-free diet works for you, then go for it. In fact, with the exception of the breakfast bowls, the majority of recipes in this book can be made without the grains or with a grain-free substitute, such as cauliflower rice.
GAS VS. ELECTRIC
Boiling grains is no biggie no matter what stove you have, but there's one slight change if you own an electric stove. When making quick-cooking grains such as rice, quinoa, millet, or buckwheat, instead of simply turning the heat to low once the water comes to a boil, slide the pot over to another burner that's preheated to low. The reason for this is that it can take a few minutes for the electric coils to cool from high to low heat (unlike a gas flame, which changes immediately). Those few minutes can mean the difference between mushy rice and perfectly cooked rice, hence the switch!
NUTRITIONAL POWERHOUSES
Whole, unprocessed grains are extremely nutritious. They're high in fiber, protein, B vitamins, iron, and magnesium. And as complex carbohydrates, they trigger the release of serotonin, our "happy hormone," without resulting in a sugar crash. Studies also indicate that whole grains can help guard against obesity and can even help with healthy sleep patterns. Best of all, they're inexpensive and easy to make and they store wonderfully. Unlike pasta or potatoes, you can cook them well in advance — we're talking days, weeks, or even months ahead of time! — so that they're ready and waiting for you when the mealtime rush begins.
TIPS FOR COOKING GRAINS
Let's say it together: "Cook ahead!" This is the single most important thing that I will tell you in this chapter. If you have a premade batch of grains ready and waiting for you in the fridge or freezer, then you're only a few steps away from an awesome meal. In fact, all of the bowl recipes in this book come together in less than an hour (some far less), with the assumption that your grains are precooked.
The second most important tip is, make a big batch. If you can, carve out some time on the weekend, in the morning before work, or at night while you're watching Netflix to cook your grains (the only grain that I don't usually make ahead is white rice, as the texture is best straight from the pot). Cooked grains can happily chill in the refrigerator for up to five days or in the freezer for up to three months. Sundays are usually my big-batch day, when I whip up one or two grains for the week, often making double batches of each so that I can freeze half for meals down the line (boom!).
But let's be real. There are evenings when I haven't planned ahead and the freezer stash has run dry. No fear! Cooking grains is mostly a hands-off affair, and they can simmer away while you prep the rest of dinner. Quinoa, millet, white rice, and buckwheat are the quickest cooking of the bunch and are my go-tos for those "$#%&-it's-6o'clock-and-I-haven't-started-dinner-yet" nights.
STORING AND REHEATING
If you make your grains in advance (you're amazing!), transfer them to a wide bowl or a large baking sheet and let them cool completely. Store them in a sealed container if they're going in the fridge. For freezing, I prefer to use labeled quart-size ziplock freezer bags. That way they can be stacked in a tidy pile without taking up too much space. Defrost the grains in the refrigerator overnight, at room temperature for a few hours (you can immerse the bag in warm water to expedite the process), or in the microwave (transfer the grains to a bowl and microwave them on medium power in 1-minute intervals, stirring between each, until thawed).
For salads, sautes, and stir-fries, you can use the grains cold, straight out of the fridge. For other recipes, reheat the grains in the microwave for 1 to 3 minutes, until warmed through. Or reheat them on the stovetop in a nonstick skillet or in a pot with a splash of oil, butter, or water; cook, stirring occasionally, until warm.
RICE COOKER VS. STOVETOP
I offer two foolproof methods for cooking your grains: on the stovetop or in a rice cooker. There are merits and minuses to both.
RICE COOKER
The benefit of using the rice cooker is that you can set it and forget it. If you need to run out and pick up the kids (or have a tipple with friends), you can leave your rice cooker to do its thing. A lot of new models can also be programmed ahead, meaning you can set it a few hours in advance.
The downside is that grains often take longer to cook in the rice cooker, and you lose control over the cooking process. I find that, with the exception of rice, grains often end up slightly overcooked or even occasionally undercooked, especially ones that need to be soaked first and that only work in models with a brown rice setting. However, I always use my rice cooker when making rice, because I suffer from post-traumatic stress disorder from years of overcooking rice on the stove.
STOVETOP
The stovetop is the most accurate way to cook grains, as you have more control over the cooking process. This is especially true for hearty varieties, such as wheat and barley, which can vary pretty widely in their cooking times depending on the age of the grains, the brand, the specific variety, and so on. When you use the stovetop, it's easy to check for doneness by tasting occasionally.
The drawback is that you have to be at least minimally present. You don't need to be at the stovetop or even in the kitchen for most of the time, but you'll need to monitor the grains toward the end, so no jetting off to the local watering hole.
MEASURE ... OR NOT
You know how sometimes you just can't be bothered with digging out the measuring cups (or is that just me)? I have good news. While each grain recipe lists specific grain-to-water ratios, I hereby give you permission to disregard them. Well, sort of. Instead of measuring water, you can prepare the grains "pasta style," whereby you cook them in a large pot of simmering water, just as you would pasta. This works best for larger, chewier grains, such as sorghum, any of the wheat varieties, and barley. Bring a large pot of water to a boil, and season it with salt. Add the grains, cook at a gentle boil until they reach your desired tenderness, and then drain.
No matter which cooking style you use, the best tool in your kitchen to test whether the grains are done is your teeth! Different batches of even the same grain can cook differently depending on their age and brand, so use the times in this book as guidelines. Let your mouth be the final test.
WATER OR BROTH
All of the recipes call for cooking the grains in water, giving them a neutral, clean flavor that's really versatile. However, you can swap in broth or stock for a more robust flavor when making savory dishes. You can also add aromatics to the cooking liquid, such as whole spices (cinnamon sticks, cloves, bay leaves, allspice), garlic cloves, halved shallots, citrus peel, or parsley sprigs. Just be sure that the flavors pair well with the other elements in the final dish (so no garlic in that fruity breakfast bowl, please!).
SOAK OR NO SOAK
You have the option to soak your grains before cooking. This means simply covering the grains with water and letting them sit at room temperature for several hours or overnight. While this is optional (except when cooking certain hearty grains in the rice cooker), there are some fantastic benefits to soaking your grains.
MORE NUTRITIOUS. All whole grains contain phytic acid, an anti-nutrient that blocks the absorption of vitamins and minerals in your body. Soaking helps to remove this acid, rendering the grains more nutritious and easier to digest. Adding a splash of lemon juice or vinegar to the soaking water will neutralize this acid even further.
BETTER TEXTURE. Soaking results in a more consistent, even texture. This is especially true for buckwheat, sorghum, wheat varieties, brown rice, and black rice.
SHORTER COOKING TIME. You can shave off up to 15 minutes of the cooking time by soaking your grains first.
However, if you don't have the time or forget to soak your grains, or if you choose not to, no worries! You can absolutely still charge ahead with cooking them — just rinse them in cold water first to remove any dust or impurities on the surface.
BUYING & STORING
One of the best sources for buying grains is your local farmers' market. Purchasing from local farmers ensures not only that you're getting the freshest product possible but also that you're supporting the environment and your local community.
Most grocery stores also now carry a wide variety of grains, sold either in bulk bins or with the packaged goods. The bulk bins are often the cheapest way to go, but you have no way of knowing how old the grains are. Whole grains are susceptible to rancidity, so try to buy from stores that have a heavy turnover. Also, give the grains a whiff before buying — they should smell fresh and nutty (if they smell funky or unpleasant, they have likely gone off). Similarly, if you buy grains in packages, be sure to check their expiration dates. Bob's Red Mill is a reliable, easy-to-find brand.
Once you get home, store the grains in airtight containers (if they're not already in one) or in ziplock bags. It's best to store them in the freezer or refrigerator if you have the space, but if not, buy smaller quantities and keep them at room temperature. I store most of my grains in jars in my pantry, as we use them up quickly.
CHAPTER 2
COOKING GRAINS
Cooking grains is as elemental as it gets, involving nothing more than water and salt. The process couldn't be easier: once the grains are rinsed or soaked, the stovetop or rice cooker does most of the work for you. Use the cooking times on the following pages as guidelines — the best way to check for doneness is by tasting.
I strongly suggest doubling these recipes and freezing half for breakfasts and dinners down the line — your future self will thank you!
Also, be sure to read my make-ahead and storage tips in the preceding chapter.
While each of these grains has its own unique character in terms of flavor and texture, they are interchangeable in the superpower meal recipes except for where a particular grain is specified. I hope you'll explore each of them and discover new favorites!
(Continues…)
Excerpted from "Build-a-Bowl"
by .
Copyright © 2018 Nicki Sizemore.
Excerpted by permission of Storey Publishing.
All rights reserved. No part of this excerpt may be reproduced or reprinted without permission in writing from the publisher.
Excerpts are provided by Dial-A-Book Inc. solely for the personal use of visitors to this web site.
Table of Contents
IntroductionPart One: The Build-a-Bowl Meal Formula 1 Build-a-Bowl Basics2 Cooking Grains Barley Buckwheat Millet Quinoa Rice Varieties Sorghum Wheat Varieties Part Two: Build-a-Bowl Meals 3 Fruit4 Eggs5 Vegetables6 Legumes7 Chicken, Turkey & Pork8 Beef & Lamb9 Seafood Acknowledgments Metric Conversion Charts Resources Recipes by Type IndexRelated Subjects
Customer Reviews
Explore More Items
")

: The Fiery Cross, A Breath of Snow and Ashes, An Echo in the Bone, Written in My Own Heart's Blood")
")


")
")
")
")
